|
How to
Reset Your BIOS
|
|
Have you recently made a change to your computer's hardware
and need to reset your BIOS? Are you locked out of a computer that you
purchased secondhand because of an unknown BIOS password? If so, you'll
need to reset your BIOS to factory settings. Depending on what you have
access to, you can reset the BIOS from within the BIOS menu itself, reset
the jumper on your motherboard, or remove and reinsert the CMOS battery
that powers the BIOS memory.
|
|
Method 1 of 3:
Resetting from Within BIOS
|
|
|
|
1.
|
|
Access your BIOS. Turn on your
computer and press the key on your keyboard to enter the BIOS. This is
typically the Del (delete) key. Pre-built systems from major
manufacturers may use a function key such as F1, F2, or F10.
|
- If you are using Windows
8 with a UEFI motherboard, you may not have access to a traditional
BIOS screen and instead will need to use the Advanced Boot menu. See
Step 4 of this guide for more details.
|
- If you cannot access your
BIOS because you are locked out with a password or it has been
corrupted, use one of the following methods following this section.
|
|
2
|
|
Find the factory reset option. The location
and wording of this option varies for every different BIOS. It will
typically be called "Reset to Default", "Factory
Default", "Setup Defaults", or something similar. It may
be located in one of the tabs or it may be an option listed near the
navigation buttons.
|
- Select the option or
press the button to load your factory defaults.
|
- If your BIOS does not
have this option, use one of the following methods following this
section.
|
|
|
|
|
|
3
|
|
Save your changes and confirm
your selection if necessary. This will often be combined with
the process of exiting a BIOS. Your computer will automatically reboot.
If you need to change your BIOS settings once your BIOS resets, you may
need to reboot your computer again and enter the BIOS to change them.
|
|
Method 2 of 3:
Resetting the Jumper
|
|
|
|
1
|
|
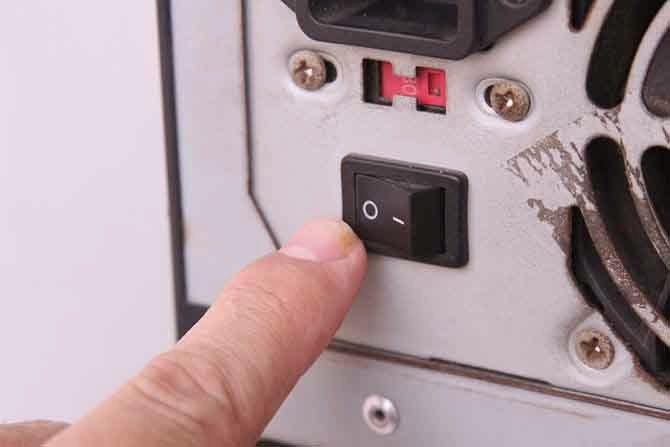
Power down your computer. Shut down your
computer from within the operating system. Locate a rocker-style switch
at the back of your PC (if applicable), and switch it from the ON
position (I) to the OFF position (O). If there is no switch, unplug the
computer from the outlet.
|
- This method will not work
for laptops.
|
|
|
|
2
|
Open your case. You will need
to be able to access the motherboard of your computer. be very careful
when working on the inside of your computer, as electrostatic discharge
can easily destroy sensitive components. Make sure that you are properly grounded before working
inside the computer.
|
|
3
|
|
Find the CMOS jumper. Locate the
three-pin jumper on your motherboard that controls the BIOS. It will
usually found near the CMOS battery. The jumper will be covering two of
the three pins.
|
- The jumper may be labeled
CLEAR, CLR, CLEAR CMOS, PSSWRD, or a variety of other labels. Refer
to your motherboard's documentation to find the correct jumper.
|
|
4
|
|
Move the jumper to the other two
pins. For example, if the jumper is covering the first and second
pins, move it so that it is covering the second and third pins. Be sure
to pull the jumper straight up to remove it so that you don't bend the
pins.
|
|
5
|
|
Press your power button. Press and hold
the power button on your computer for about 10-15 seconds (nothing should
happen because the power is turned off). This will discharge any
remaining power stored in the capacitors. This will make the BIOS reset.
|
|
6
|
|
Return the jumper to its default
position. Put the jumper back on the pins that it was originally on.
This will allow you to access your BIOS when you start your computer up.
Close up the case when you are finished.
|
|
7
|
|
Turn the power supply back on. Move the
rocker-style switch at the back of your PC to the ON (I) position. If you
unplugged the computer from the wall, plug it back in.
|
|
|
|
8
|
Power on your
PC. Press the front Power button. You will need to enter your
BIOS and reconfigure all of the settings, including the
time, date, and boot order.
|
|
Method 3 of 3:
Removing the CMOS Battery
|
|
|
|
|
|
1
|
|
Power down your
computer. Shut down your computer from within the operating system.
Locate a rocker-style switch at the back of your PC (if applicable), and
switch it from the ON position (I) to the OFF position (O). If there is
no switch, unplug the computer from the outlet.
|
|
|
|
2
|
Open your case. You will need
to be able to access the motherboard of your computer. be very careful
when working on the inside of your computer, as electrostatic discharge
can easily destroy sensitive components. Make sure that you are properly grounded before working
inside the computer.
|
- For many laptops, you can
access the CMOS battery from a removable panel on the bottom of the
laptop. If there is no panel available, you will most likely need to
disassemble the laptop to access it.
|
|
3
|
|
·
Remove the CMOS battery. The battery is
typically located near your PCI slots, but may be in different locations
depending on the manufacturer of your motherboard. It may be hidden by
expansion cards and cables. The battery is usually a standard 3V, round,
flat watch battery (CR2032).
|
|
|
|
4
|
|
Press your power button. Press and hold
the power button on your computer for about 10-15 seconds (nothing should
happen because the power is turned off). This will discharge any
remaining power stored in the capacitors. By discharging the power, the
CMOS memory will reset, thereby resetting your BIOS.
|
|
|
|
5
|
|
Reinsert the CMOS battery. Carefully
reinsert the CMOS battery back into its housing. Make sure that you have
put the battery in the right direction. The slightly smaller side should
be facing down.
|
- Close your case back up after
reinserting the battery.
|
|
|
|
6
|
|
Turn the power supply back on. Move the
rocker-style switch at the back of your PC to the ON (I) position. If you
unplugged the computer from the wall, plug it back in.
|
|
7
|
|
Power on your PC. Press the
front Power button. You will need to enter your BIOS and reconfigure all
of the settings, including the time, date, and boot order.
|


Comments
Post a Comment